Electronic Sump Pump Switch HC6000
Electronic Sump Pump Switch HC6000
We like the HC6000 Electronic Switch. Here’s why! It solved our problem!
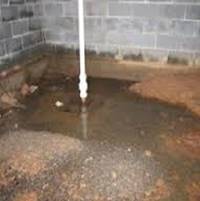
 Our sump pump runs even when there is no heavy rainstorm because we live in a high water table area. So when those heavy rainstorms come, we were always very nervous because sooner or later our sump pump float switch would fail and it probably would happen during a heavy rainstorm.
Our basement is finished and a flood would be a stressful, time consuming and an expensive event. So we did some research and found the HC6000 electronic switch online. Like a typical home owner we were skeptical so invited the manufacturer to our home to see our sump pump system setup. This is back in 2011 when HC6000 first becomes available to the general public. After the manufacturer explains how it works and assures us it would be great for us, we installed it. This is a great decision because since 2011 it has not failed yet. This is a great electronic sump pump switch worth sharing.
Where Is The Float For This Switch?
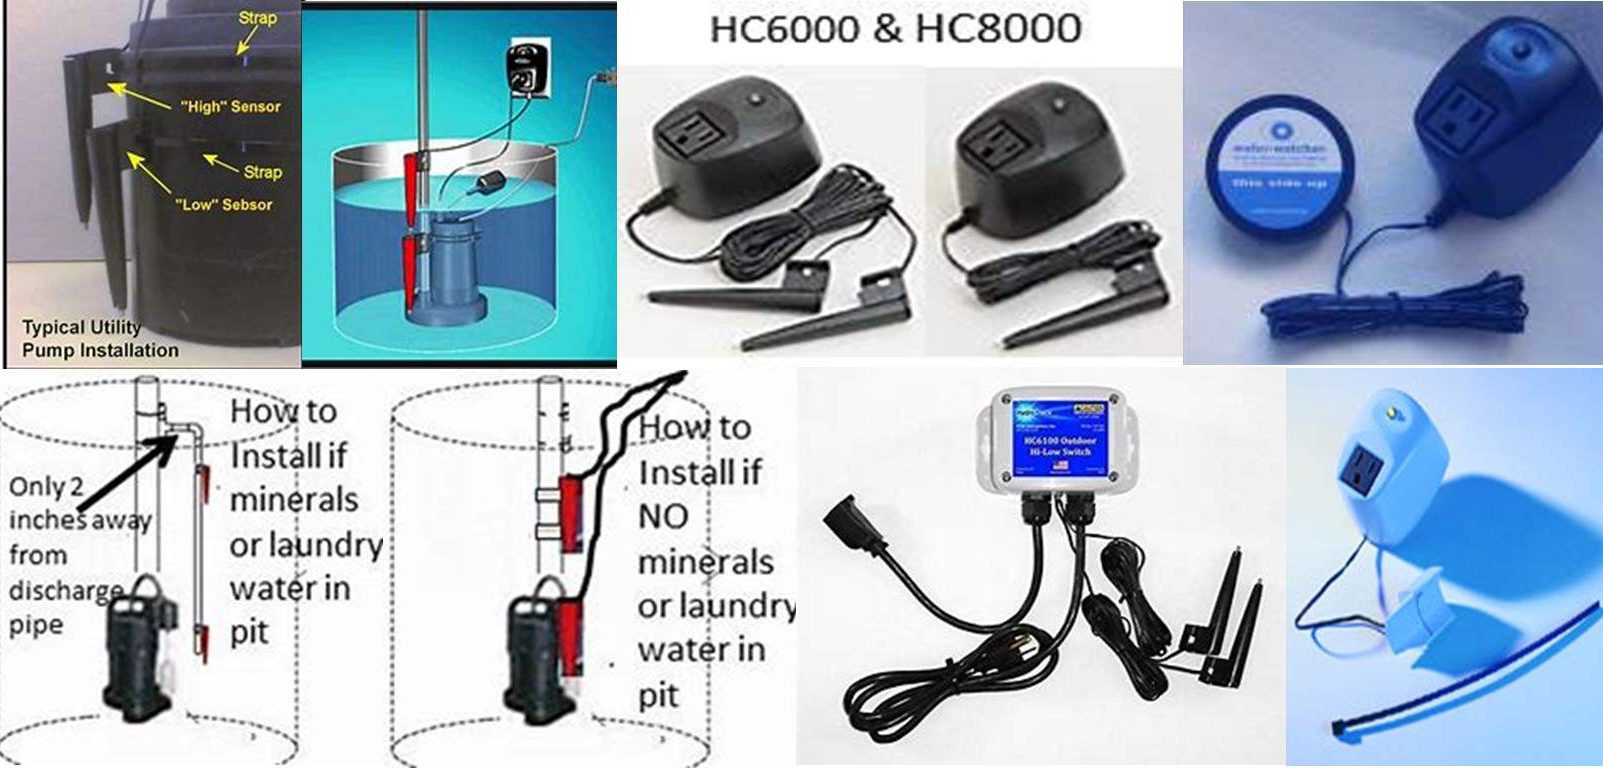
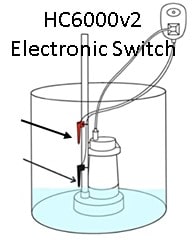 There is no typical disk or ball shaped float. Instead the electronic switch uses two metal probes. The probes sense water pressure and height. When the water reaches their tips a signal is sent to the switch electronic chip. The chip software reads the signal and sends electrical current to the pump motor when the top tip (red colored probe) touches water and stops current when the bottom tip no longer touches water.
What If My Sump Pump Already Has A Float Switch, Can I Use This Switch?
 Yes, you can still install this Electronic Switch if any of the following conditions exist.
1) The existing pump uses a piggy back switch: one for the switch and one for the pump motor. Unplug the switch from the piggyback and plug in the motor instead.
2) The existing float switch already failed. Plug the pump motor into the HC6000v2 piggyback switch.
3) The existing pump is a manual pump and needs a switch to operate. Plug the HC6000 into the wall socket and then plugin the manual sump pump into the piggyback switch.
4) The existing float switch works, but you want to try this one. Open the switch head and disable the two lead wires (positive first; then negative). Plug the HC6000 into the wall socket and then plugin the sump pump into the piggyback switch. Any of the above conditions will work to install the electronic sump pump switch now.
Can I Install This Electronic Switch Myself?
Yes, you most certainly can. But before installing, there are a few things to consider first.
☑ The circuit breaker amps must 15 amp. Standard house amps are 15 and a single pole wall outlet works.
☑ The sump pump must use less than 14 amps of current. Even Zoeller’s powerful sump pump motors use less than that.
☑ Rather than wonder if the ground water coming into the basin has mineral in it, install the added PVC side arm to prevent any potential mineral deposits and eliminate periodic cleaning of the probe tips.
So What Needs To Be Installed?
This electronic switch relies on electric conductivity passing through the water to send a signal to the circuit board which is programmed to complete the electric circuit so the pump runs. In normal circumstances enough conductivity is reached when both metal tipped probes are touching water. But when pit water contains high iron or mineral content, the electric conductivity is reduced significantly to the extent that a pit can be filled to overflowing before enough electrical current is sensed by the probes even though they are immersed in water. To remedy this another PVC side arm can be installed to hold the probes.
So our recommendation is to install this side arm kit whether there is mineral in the pit or not.
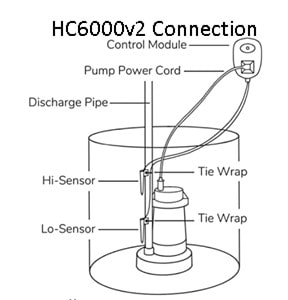
A Total HC6000 Installation Includes The Following
☑ A piggy back switch which has a plugin for the pump motor and a plugin for the wall socket.
☑ Added PVC piping for guaranteed current sensing with a PVC pipe holder.
The Installation Manual For the HC6000 Electronic Sump Pump Switch
This manual is well written and diagramed so it is possible to follow and do your own installation. Download the HC6000v2 and HC6000-PRO Electronic Switch Manual Now.
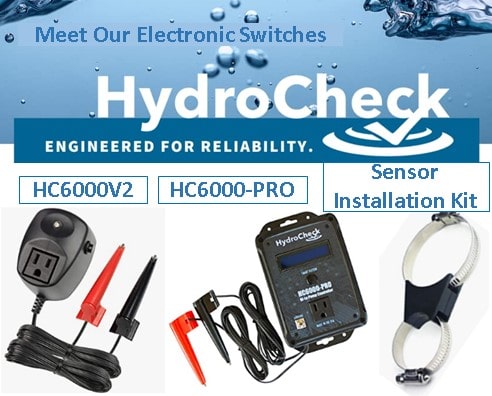
Shop Electronic Sump Pump Switch HC6000 And HC6000 PRO
The HC6000v2 Switch
The HC6000 Pro Switch With Pump Performance Monitoring And Messaging
The LCD screen displays real-time data including the pump’s motor current, cycle time, water sensor status, and pump effectiveness/readiness; Built-in alarms will sound to alert you to problems such as high water, dirty sensors, weak ground, and more!
The Sensor Installation Kit
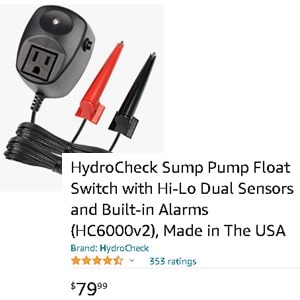
HydroCheck HC6000v2 Sump Pump Float Switch Bundle with Sensor Installation Kit
HC6000 Is The Solution For Sump Pump Float Switch Problems
Electronic sump pump switch HC6000 is the solution for common sump pump float switch problems. The following information reveals why the HC6000 is the best solution for a sump pump float switch. Read more to find out why consumers prefer the HC6000. Find out how it works to make it so reliable.
What Are The Most Common Sump Pump Float Switch Problems?
The most common sump pump float switch problems include the following.
- The float gets hung up, caught and tangled.
- The float gets punctured and fills with water and thus fails to raise when the water level in the pit raises.
- The float takes up extra pit diameter making it difficult to fit a backup sump pump with the primary pump.
- The switch wears out or gets stuck in the ‘on’ position
- The pump motor short cycles because the distance between the ‘on’ ‘off’ position is too little.
- The debris, minerals and contamination in the water affect the float and or switch.
- The float switches have a short life span.
|
|
Why Is The Electronic Switch HC6000 The Solution For Sump Pump Float Switch Problems?
The HC6000 Hi-Lo Switch Eliminates Sump Pump Float Switch Problems
Here is how the HC6000 Hi Lo switch eliminates common sump pump switch problems. The HC6000 ……
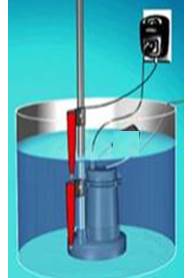
(Please note image on right: The sensors for the HC6000 are identified in red.)
- Does not get hung up or tangled. It is attached to the discharge pipe. There is nothing swinging or dangling. The HC6000 has NO moving parts.
- Is easy to install and uninstall. It attaches to the discharge pipe and the sump pump motor cord is plugged into the HC6000 piggyback switch.
- Does not get stuck in the ‘on’ position because there is nothing to move up and down when the water rises. The HC6000 has two sensors which are attached to the discharge pipe. The sensors are affected by water resistance. When the water is below the bottom sensor the water resistance is high. When the water reaches the top sensor resistance is very low and the controller is triggered to activate the sump pump.
- Will not be affected by chemicals,, minerals or debris in the water. The HC6000 does not required cleaning or maintenance.
- Fits in small or crowded places. The HC6000 Hi-Lo Switch has a small profile and is attached to the discharge pipe so takes no additional space.
- Allows the homeowner to set the ‘on’ ‘off’ position of the pump. The bottom sensor can be placed as low as 1/2 inch; however it is important to put the bottom sensor above the pump base so the pump keeps pumping water not air when the motor is on. The maximum height the top sensor can be set is 12 feet. The ability to customize the height of the ‘on’ ‘off’ position is very beneficial for the house that is located in a high water table area. Placing the top sensor higher in the pit reduces the number of run times for the motor.
- Compatible with up to and including 3/4 HP and up to and including 14 amp pumps.
- Has a lifetime warranty.
|
   |
What Is the HC6000 Hi Lo Sump Pump Switch?
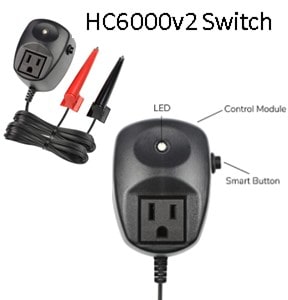
The HC6000 Hi Lo Sump Pump Switch Is An Electronic Switch With The Following Parts.
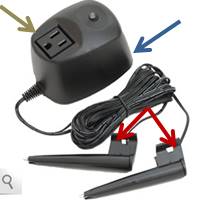
- It’s electronic controller has a piggyback switch. This means the pump motor cord plugs into the HC6000 Switch and the HC6000 plugs into the wall socket.
- The back side of the controller is identified by the blue arrow. The back side of the controller has prongs like any other plug. These prongs plug into the electrical wall outlet.
- The top side of the controller is identified by the brown arrow. The top side of the controller has a socket. The sump pump motor chord plugs into the controller socket.
- Includes two sensors, electric cords attached to the sensors which are about 12 feet long and a controller with a piggyback switch and zip-straps for attachment to the discharge pipe.
- The two sensors are identified by red arrows. The two sensors are attached to the discharge pipe so they can sense the height of the water in the pit.
|
 |
How To Install The Electronic Pump Switch Controller HC6000
Steps For Installing the HC6000 Hi Lo Switch
Before Installation, identify what kind of installation situation you have.
- Does your existing sump pump have a piggyback plug?
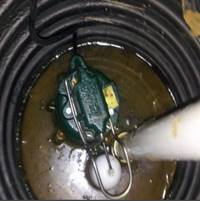
- Piggyback plug exists. If your existing sump pump has a piggyback plug, you will only need to tie the existing float switch cord/plug (the one with the piggyback where the pump motor was plugged in) up and out of the way. The float switch cord/plug will not be used. In the diagram on the right, the blue arrow points to the pump motor cord and plug The red arrow points to the float piggy back switch.
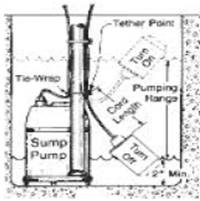
- Piggyback plug does not exist. If your existing sump pump does not have a piggyback style plug, then you will need to remove the float from the pump thus deactivating the float mechanism. Next you will need to premanently set the switch in the ‘up’ and ‘on’ position. A zip tie or wire can be used. By tying the switch to permanent ‘on’ postion, the HC6000 Hi Lo controller will provide power to the sump pump when both sensors are submerged in water.
- What kind of water enters your pit?
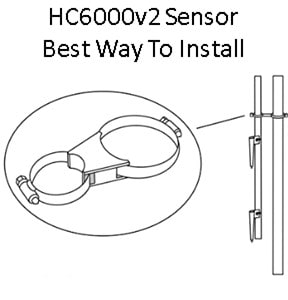
- Uncontaminated – no minerals or laundry water. If the pit water is uncontaminated, the two sensors, bottom (Lo) and top (Hi) can be attached directly to the discharge pipe your sump pump uses.
- Contaminated with minerals or laundry water. If the pit water is contaminated, the two sensors should be attached to a 1/2 or 3/4 inch PVC pipe; then this PVC pipe should be attached to the main discharge pipe your sump pump uses.
Step 1 – Unplug your existing sump pump.
- If a Piggyback plug exists, pull the pump motor plug out, pull the piggyback plug out from the wall socket, tie the existing float switch cord/plug up and out of the way. The float switch cord/plug will not be used. Unplug the piggyback plug from the wall socket.
- If a Piggyback plug does not exist, unplug the pump motor cord from the wall socket, remove the float from the pump thus deactivating the float mechanism. Premanently set the switch in the ‘up’ and ‘on’ position. A zip tie or wire can be used. By tying the switch to permanent ‘on’ postion, the HC6000 Hi Lo controller will provide power to the sump pump when both sensors are submerged in water.
|
Step One: Unplug the sump pump plug. Piggy Back Plug |
Step 2 – Determine the height of the sensors and attach them.
- Secure the top sensor with a zip tie at the level you wish the sump pump to turn on.
- The bottom sensor should be placed at the level you wish the pump to turn off.
- We recommend placing the bottom sensor just above the base of the pump impeller so the pump will not run after the water is below the impeller.
- Make sure to tie the wires from the sensors out of the way for future access to the pump. Note the two illustrations on the right.
|
Step Two: Attach the sensors. Installation For NONE Contaminated WaterInstallation For Contaminated Water |
Step Three – Plug the Controller in the Wall Socket.
- Plug the HC6000 controller into the wall socket.
- Initially the LED light will be RED and the controller buzzer will beep 3 times. Once you hear the 3 beeps the electronic switch is ready for operation.
- Plug the pump motor into the controller piggyback switch.
|
Step Three: Watch for the Controller LED RED Light. Installed HC6000 Controller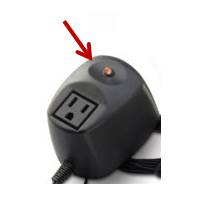 |
Step Four – Watch for the sump pump to turn on when both sensors are immersed in water. Only the tip of the top sensor needs to be immersed. Full immersion in water will not cause damage to the sensors.
- Continue to watch the level of the water as it rises and lowers in the pit.
- When the water reaches the bottom sensor the LED light will flash RED.
- As the water rises and reaches the top sensor the LED light will turn GREEN and the sump pump should run.
- The LED light will be solid GREEN as long as the bottom sensor is immersed in water and the top sensor tip senses water.
- When the water recedes below the top sensor the LED light will flash GREEN.
- Once the water recedes below the bottom sensor, the LED light will turn RED.
|
Step Four: Watch the Controller and LED Light as the water level rises in the pit. Installed HC6000 Controller
Installed HC6000 Controller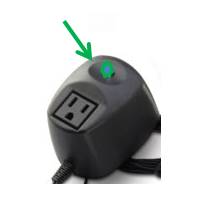 |
How Does The Electronic Sump Pump Switch HC6000 Operate?
The height at which the sensors are placed determines when the control module turns the pump on and off. Here is the sequence at which the Hi Lo Switch Controller operates:
- When the water is below both sensors, the pump is off.
- The pump is off when the water is above the lower (bottom) sensor, but hasn’t reached the upper (top) sensor.
- When the water reaches the upper sensor, the pump is turned on.
- The pump stays on while the water is between the sensors.
- The pump is turned off when the water drops below the lower sensor.
|
Step 1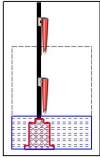
Step 2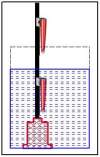
Step 3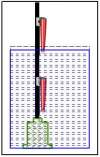
Step 4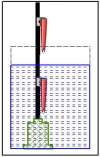
Step 5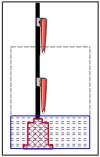 |
Other Applications And Uses
The HC6000 can be used in a well or any water event where the sensors can be place vertically with one sensor above the other sensor and the on and off pump event is appropriate for the situation.
The HC6000 is NOT for outdoor use.
Does The HC6000 Have An Alarm?
The Hi-Lo Pump Switch does have an indication light for normal situations and an alarm (buzzer) which sounds when abnormal situations occur. The following Trouble Shooting ideas have been suggested by the manufacture, STAK Enterprises, Inc.
The following are normal situations.
| Light Indicator |
Description
|
| Steady Red LED |
Pump off, no water detected |
| Flashing Red LED |
Pump off, lower sensor detecting water |
| Steady Green LED |
Pump on, water detected by both sensors |
If this condition exists for more than 30 seconds the high-level alarm will sound. |
| Flashing Green LED |
Pump on, water below upper sensor |
When the alarm sounds, one of the following abnormal situations may exist.
| Alarm |
Description
|
Possible Causes
|
| 2 Beeps |
Can’t turn pump on |
- Pump not plugged in
- Float piggy-back plug not disconnected
- Float switch not secured in “on” position (internally wired float switch)
|
| 3 Beeps |
High Level Alarm |
- Pump can’t keep up with water coming in
- Discharge plumbing blocked
- Debris on sensor
|
| Steady Slow Beep |
Motor current above normal |
|
| Steady Fast Beep |
Motor current too high |
|
The alarm can be disabled by the following steps.
- Unplug pump from control module.
- Lift top sensor out of water.
- Unplug controller from 120V wall outlet. Wait 10 seconds.
- Plug controller back into wall outlet. Wait 10 seconds.
- Unplug controller from 120V wall outlet. Wait 10 seconds.
- Plug controller back into wall outlet. Wait 10 seconds.
- Plug pump back into controller
- Place top sensor back into water
Additional Questions About The Hydrocheck HC6000
Q. Does the HC6000 switch stay on for several minutes or hours if need be if the water touched the top sensor and remains above the bottom sensor?
A. Yes, the switch will keep the pump activated once the water reaches the top sensor and stays above the bottom sensor. Once the water goes below the bottom sensor the pump will stop running.
Q. Is there a timed runtime after the water goes below the bottom sensor like some switches run 10 seconds after the water goes below the float?
A. No, there is no timed, set runtime after the water goes below the bottom sensor. As soon as the water goes below the bottom sensor, the pump shuts off.
Q. Will the electrical cords from the sensors be long enough?
A. The electrical cord for the sensors is 12 feet.
Q. My discharge pipes are 2 inches in diameter. Will the zip ties be long enough to tie around the sensors and the 2 inch diameter discharge pipe?
A. Yes.
Q. Can I use the Hydrocheck HC6000 with a Zoeller sump pump M53 or M98?
A. Yes, The HC6000 and the HC8000 switch controllers work with sump pumps running on less than 14 amps. The Zoeller M53 running amps is 9.7 and Zoeller M98 running amps is 9.4.
Specifications from the Manufacturer STAK Enterprises Inc.
|
Voltage
|
120 VAC
|
|
| Minimum Current |
None
|
|
| Maximum Current |
14 Amps
|
|
| Minimum Run Time |
None
|
|
| Maximum Run Time |
None
|
|
| Sensor Cable Length |
12 ft
|
|
| Listing |
CUL
|
|
| Environment |
Indoor Use Only
|
|
| Warranty |
Lifetime
|
|
Shop For HydroCheck HC6000 and HC6000-PRO
Both the HC6000 and the HC8000 are good electronic sump pump switches/controllers. The HC6000 only costs $5 more than the one sensor HC8000. The HC6000 allows the homeowner to set the ‘on’ ‘off’ point for the pump; therefore we believe the HC6000 is the best choice.
Shop Electronic Sump Pump Switch HC6000 And HC6000 PRO
The HC6000v2 Switch
The HC6000 Pro Switch With Pump Performance Monitoring And Messaging
The LCD screen displays real-time data including the pump’s motor current, cycle time, water sensor status, and pump effectiveness/readiness; Built-in alarms will sound to alert you to problems such as high water, dirty sensors, weak ground, and more!
The Sensor Installation Kit
HydroCheck HC6000v2 Sump Pump Float Switch Bundle with Sensor Installation Kit
The HC6000v2 Switch Plus Sensor Kit Installation
The HydroCheck HC6000v2 Hi-Lo Pump Controller acts as a universal, electronic switch that works with all types of sump pumps and utility pumps. Its two sensors allow homeowner to set pump ON and OFF height reducing pump cycling anywhere from a 1/2 inch to 12 feet! The kit provides a way to eliminate false starts because of water iron or mineral content and the need to clean the sensors periodically.
